Integrate EKB Chatbot to MS Teams
Integrating EKB with Microsoft Teams allows you to bring intelligent, context-aware chat directly into your team's collaboration environment. This guide walks you through the steps to set up the EKB chatbot in Microsoft Teams, enabling seamless communication with your AI agent without leaving the Teams interface.
Prerequisites
- Admin access to Azure to create the bot
- Admin access to Teams Dev Portal
A customer-managed Azure Bot Service is required. Without that bot service, the Teams app will not be able to communicate with EKB. Creating the app in the Teams Developer Portal is required, and that app must use the Azure Bot from the steps below.
Cloud customers do not create an Azure App Service or App Service plan. The Azure Bot sends messages to the endpoint EKB hosts at https://api.getodin.ai/teams/events.
Setup Steps
1. Create the Azure Bot
- Go to the Azure dashboard.
- Click Create Resource.
- Type
Botin the search bar and select Azure Bot. - Create a new Azure Bot and set the desired Display Name.
2. Configure the Bot
- Go to the Configuration tab and update the Messaging Endpoint to point to your server URL.infoCloud customers, please enter
https://api.getodin.ai/teams/events
On-Premise customers, please enter<your backend root URL>/teams/events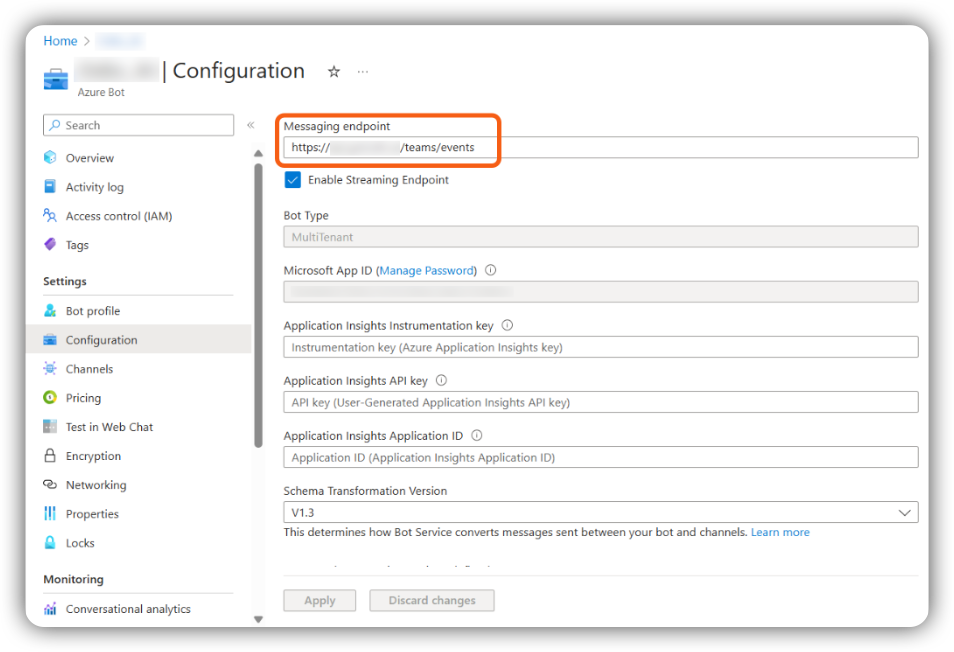
- In the Configuration tab, copy the App ID and Tenant ID, then navigate to Manage Passwords.
- Create a new password for the bot and save it for later use.
- Enable a streaming endpoint for the bot in Azure and point it to the URL for that endpoint.
3. Enable Teams Channel
- Click Channels on the left side of the Azure portal and enable the Teams interaction channel for the bot.
4. Register the Bot in EKB
App ID, Tenant ID, and App Password to have the bot registered for you.- In EKB, navigate to the Super Admin page and select Teams Bots on the left-hand side.
- Click Register Bot.
- Enter the App ID, Tenant ID, and Password collected in steps 6–7. Click Register Bot.
5. Create the App in Teams Dev Portal
- Go to the Teams Developer Portal.
- Click New App.
- Populate the app information:
- Short Description — required, cannot be empty.
- Long Description — required, cannot be empty.
- Populate the App ID field with the App ID from the customer-managed Azure Bot. Without that bot service, the Teams app will not be able to communicate with EKB.
6. Configure Bot Features
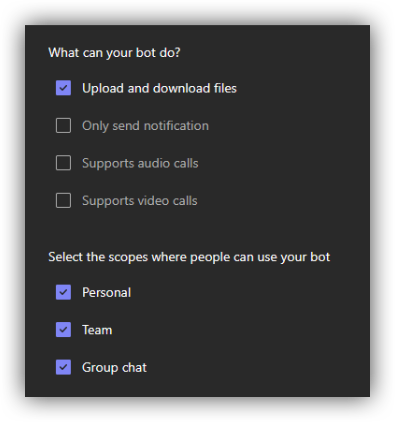
- Go to App Features and add the bot, providing the App ID from Azure.
- Configure the bot capabilities as follows:
7. Deploy
- Deploy the package following your organization's standard policy for deploying new Teams applications.
- To connect the bot to a project, send it
!setupme(just for you) or!setup(for everyone in the conversation) as a first message. See Connecting the Bot to a Project.
Recommended Deployment Method
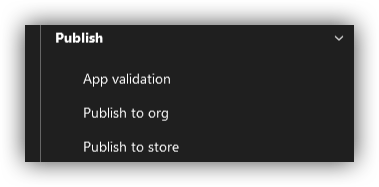
Publish to Org
On the app page in the Microsoft Teams Developer Dashboard, scroll to the bottom of the left-hand sidebar. Under Publish, select Publish to org.
Grant Admin Consent
The app will be posted to your Teams instance and may require Administrator consent. Consent can be granted from the Microsoft Teams Admin Center.
Wait for Propagation
After consent is granted, allow a few hours for permissions to propagate before the bot becomes usable. This delay is caused by Microsoft's internal review process for custom applications, even when restricted to a single organization.
Connecting the Bot to a Project
The bot answers from an Odin project, using an API key and secret to act on it. There are two ways to connect one, and both open a short form in Teams. In channels and group chats, @mention the bot when you send a command, for example @Odin !setup.
Shared Connection (!setup)
!setup connects a project for everyone in the conversation, using the Project ID plus an API key and secret that can access it.
By default, a shared connection has per-bot, per-Teams-instance granularity: it applies across the entire Teams instance, including all channels, groups, and direct messages.
Personal Connection (!setupme)
!setupme connects your own Odin account. Enter an API key and secret from your own account settings (a project-level key is not accepted) and, optionally, a Project ID you have access to. Leave the Project ID blank to use your personal Autopilot project.
A personal connection only answers you, and it always takes priority over a shared one. !resetme removes it, after which the bot answers you from the shared connection again.
Per-Channel Settings (On-Premise Only)
For greater granularity — such as using one bot with multiple projects depending on the channel, group, or user — set the following backend environment variable:
TEAMS_USE_PER_CHANNEL_SETTINGS=TRUE
With it set, !setup connects a project per channel (and per person in direct messages), and a personal connection made with !setupme in a channel applies to that channel only. A personal connection made in a direct message applies to your direct messages with the bot.
This setting is only available for on-premise customers. It is not supported for cloud-hosted deployments.
Agent Selection
The bot answers with the project's currently set default agent. A personal connection with no Project ID uses your Autopilot project, which answers as Odin's Autopilot agent.
If the project turns on Allow Agent Selection in its Teams App settings, anyone with a personal connection (!setupme) can pick a different agent for themselves: type !agent, or press Change agent on the Home card, and choose from the agents your role can use in Odin's web chat, Autopilot included. Project default follows whichever agent the project names, even if that changes later.
Your pick only affects your own connection. It is kept when you re-run !setupme for the same project, cleared when you connect a different one, and the conversation history stays when you switch. Shared connections (!setup) always answer with the project's default agent. If the agent you picked is deleted, or your role loses access to it, the bot tells you once and goes back to the project default. Turning the setting off sends everyone back to the default.
Using the Bot
Home Card
Type !home to see which project the bot is connected to, what it can do, and a few suggested questions to try. The card has buttons to change the project and list the project's integrations. The bot also shows it when it is first installed in a personal chat. When your connection can pick its agent, the card also shows which agent is answering you, with a Change agent button.
Live Status
While the agent works, the bot shows what it is doing — Thinking..., or the tool it is using — before the answer arrives. In personal chats this appears as a live status line; in channels and group chats the bot's message is updated in place. Only the final answer stays in the conversation. This can be turned off with the Live Status toggle in the Teams App settings.
Connecting Integrations
When the agent needs an integration that is not connected yet, the bot posts a card:
- For services that sign in with OAuth (for example Gmail or Notion), select Connect, finish signing in in your browser, then select Continue.
- For services that use an API key or token, select Connect and enter the credentials in the form that opens.
!integrations lists the integrations the project has connected and the ones it could connect. Connecting and disconnecting integrations is done in Odin.
Approvals and Questions
If the agent wants to run an action that needs your approval, the bot shows the action's details with Allow and Deny buttons. If it needs more information, it asks with a short form you can answer directly in Teams.
See Available Commands for every command the bot accepts.