Setting Up Okta for EK SSO
This guide walks through configuring Okta as the Identity Provider (IdP) for SAML SSO on your on-premise EK instance. It covers the SAML settings to enter in Okta, how to retrieve your Okta metadata, and how to register the domain in EK to complete the integration.
EK's generic SAML flow works with Okta out of the box. If you haven't already, read the SAML SSO Overview to understand how the integration works before you begin.
Prerequisites
- You have admin access to your Okta organization.
- You have Super Admin access to your on-premise EK instance.
- You know the fully qualified domain name (FQDN) of your EK backend host (e.g.
ek-api.corp.acme.com). - You know the email domain you want to enable SSO for (e.g.
acme.com).
Part 1 — Configure Okta
Create a New SAML Application in Okta
- Create a new app integration
In your Okta admin console, navigate to Applications → Applications and click Create App Integration. Select SAML 2.0 as the sign-in method.
- Enter the SAML settings
In the Configure SAML step, enter the following values:
Field Value Single Sign-On URL https://<your-FQDN>/backend/user/generic/sso/saml/acs/adminRecipient URL https://<your-FQDN>/backend/user/generic/sso/saml/acs/adminDestination URL https://<your-FQDN>/backend/user/generic/sso/saml/acs/adminAudience Restriction (Entity ID) https://<your-FQDN>/backend/user/generic/sso/saml/acs/adminDefault Relay State defaultor set to the domain name - Add attribute statements
Still in the Configure SAML step, scroll down to Attribute Statements and add the following:
Name Name Format Value emailBasic user.emailfirst_nameBasic user.firstNamelast_nameBasic user.lastNameuser_nameBasic user.loginDisplayNameBasic user.displayNameobjectIdentifierUnspecified user.getInternalProperty("id") - Complete the setup
Finish the application creation wizard. Assign the application to the users or groups that should have SSO access to EK.
Part 2 — Retrieve the Okta Metadata
Once the Okta application is created, retrieve the IdP metadata URL:
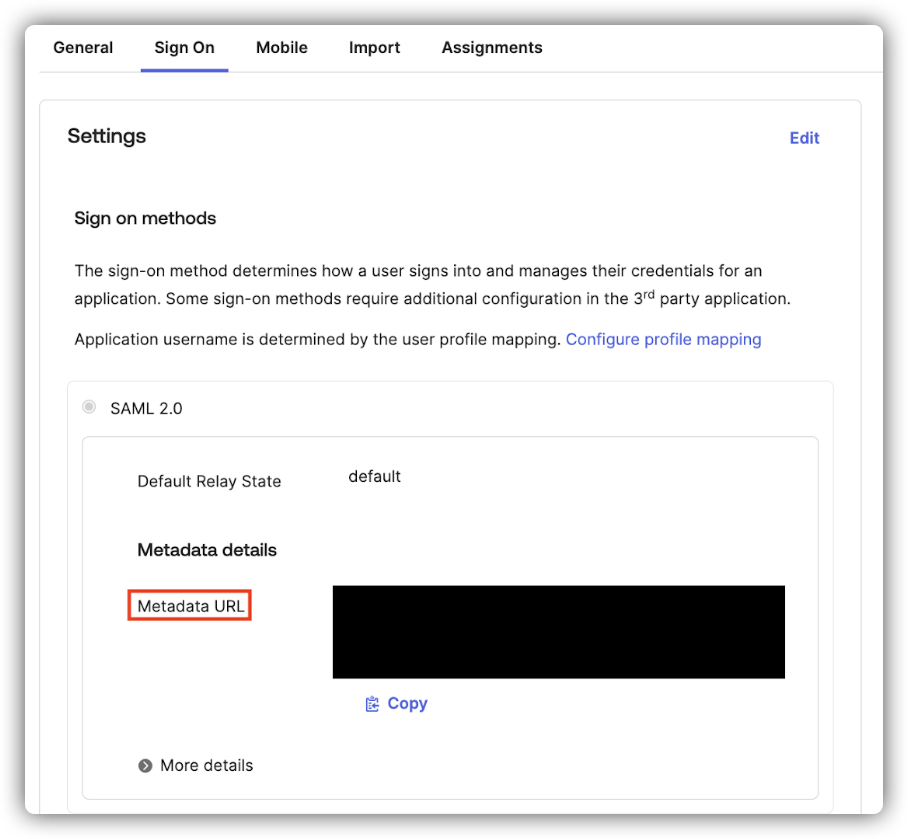
- Go to the Sign On tab
Open the application in Okta and navigate to the Sign On tab.
- Find the Metadata URL
Under Settings → SAML 2.0 → Metadata details, copy the Metadata URL.
The path is:
Sign On > Settings > SAML 2.0 > Metadata details > Metadata URLYou will need this URL in Part 3.
Part 3 — Register the Domain in EK
Send a POST request to the domain registration endpoint:
curl -X POST "https://<your-backend-host>/backend/sso/add_new_configuration" \
  -H "Content-Type: application/json" \
  -H "X-API-KEY: YOUR_API_KEY" \
  -H "X-API-SECRET: YOUR_API_SECRET" \
  -d '{
    "enterprise_id": "acme.com",
    "provider": "okta",
    "metadata_url": "https://your-okta-metadata-url",
    "backend_root_url": "<your-backend-host>/backend"
  }'
Required Fields
| Field | Description |
|---|---|
enterprise_id | The email domain of your users (e.g. acme.com). |
provider | "okta" |
metadata_url | The Metadata URL from Part 2. |
backend_root_url | (Optional) Required only in proxy setups to ensure correct routing. |
Authentication
The endpoint requires your EK API Key and Secret passed as X-API-KEY and X-API-SECRET headers.
On success, a record is created in the sso_providers table on the backend.
Part 4 — Configure the Frontend
Once the domain is registered, set the frontend environment variable and restart the frontend service.
- Open the frontend environment file
On your on-premise deployment server, open
onprem-deployment/.env.web. - Add the environment variable
Add the following line, replacing
acme.comwith your actual email domain:VITE_SSO_ENTERPRISE_ID=acme.com - Restart the frontend servicesdocker compose -f docker-compose downdocker compose -f docker-compose up -d
Test the Integration
Sign in to EK with a real @<domain> user to confirm the flow works end to end. If the user authenticates successfully but is denied access, check your SAML Access Controls configuration — see the EK SAML Access Controls and Automated Team/Project Assignment guide.